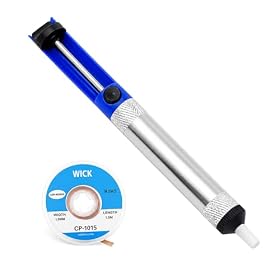
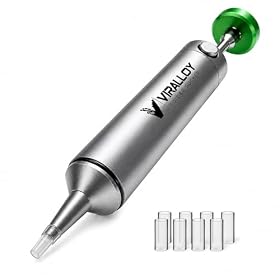
Desoldering a through-hole component means removing the solder from its leads so the part can be lifted from the circuit board. The basic process is to heat one joint at a time, remove the liquid solder with a solder sucker or desoldering braid, and free the component only when its leads move easily. Never force the part; resistance usually means solder remains on one or more leads.
What you need
- Temperature-controlled soldering iron with a clean, properly sized tip
- Solder sucker, desoldering pump, or desoldering braid
- Soldering flux, if the solder does not flow readily
- Needle-nose pliers or component tweezers
- Eye protection
- A stable, well-lit work surface
- Fume extraction or good ventilation
Use the iron, tip temperature, and soldering method recommended by the equipment and board manufacturers. Avoid touching the iron tip, molten solder, or recently heated component leads.
Before desoldering
Identify the component and board condition
Check which component you intend to remove and note its orientation. A quick photo can help you reinstall it correctly. Inspect both sides of the board for:
- Cracked or lifted copper pads
- Large ground-plane connections
- Solder bridges between nearby pins
- Components that may be heat-sensitive
- Conformal coating, adhesive, or other material covering the joints
If the board is valuable, practice the technique on scrap electronics first.
Choose the removal method
A solder sucker works well when a joint contains a visible amount of solder. A desoldering braid is useful for removing thin layers of solder, clearing a hole, or working in a tight area. For many components, using both is effective: use the pump to remove most of the solder, then braid to clear the remaining film.
How to desolder the component
1. Secure the circuit board
Hold the board in a position that keeps both hands available if possible. A vise with padded jaws or a circuit-board holder can help, but do not clamp directly onto fragile components or force the board flat.
2. Heat the solder joint
Place the clean iron tip against the joint so it contacts both the solder and the component lead. Add a small amount of fresh solder if the old solder does not melt easily. Fresh solder can improve heat transfer and help old or oxidized solder flow.
Do not scrape the pad with the iron or hold heat on the joint longer than necessary. Heat the joint only until the solder becomes fully liquid.
3. Remove the molten solder
With a solder sucker:
- Set or prime the pump according to its instructions.
- Heat the joint until the solder flows.
- Position the pump nozzle close to the molten solder without pushing hard against the board.
- Trigger the pump while keeping the iron on the joint or removing it immediately afterward, depending on the pump design.
- Let the joint cool briefly, then inspect it.
With desoldering braid:
- Place the braid over the joint.
- Put the heated iron tip on top of the braid.
- Wait for the solder to wick into the braid.
- Lift the braid and iron together, or follow the braid manufacturer's recommended technique.
- Cut off the used section before moving to the next joint.
Do not drag braid across the board while it is hot. That can lift a softened pad or damage the solder mask.
4. Clear the through-hole
After removing the surface solder, check whether you can see an open hole through the board. If solder remains, reheat the joint and use the pump or a small fresh section of braid. Avoid pushing a sharp object through the hole while the board is cold; this can damage the plated barrel that connects the pad to the circuit layers.
For multilayer boards or ground-plane connections, the joint may take longer to heat. Use the iron and temperature recommended for the board and solder type, and take breaks rather than applying prolonged heat.
5. Free the component
Once all holes are clear, gently move the component from the opposite side of the board. If it does not lift with light pressure, stop and inspect every lead. There may be solder on another pin, solder hidden on the underside, or adhesive holding the part in place.
For a component with multiple leads, alternate between pins and remove the part gradually. Do not lever the component against the board, because that can pull up pads or break internal vias.
6. Clean and inspect the board
Remove leftover flux with a board-safe cleaner if appropriate for the board and finish. Inspect the holes, pads, and nearby traces under good light. Look for:
- Lifted or missing pads
- Cracks around solder joints
- Remaining solder bridges
- Torn traces
- Excessive discoloration from heat
Repair damaged pads or traces before installing a replacement component. For complex multilayer-board damage, professional repair may be safer than attempting to rebuild the connection yourself.
Troubleshooting common problems
The solder will not melt
Check that the iron is reaching its set temperature and that the tip is tinned and making good contact. Add a small amount of compatible fresh solder or flux. A large ground plane can draw heat away from the joint, so use an appropriately sized tip and follow the board and iron manufacturer's guidance.
If the joint may contain lead-free solder, it can behave differently from older leaded solder. Do not assume the original solder type; use suitable materials and conservative heat practices.
The solder sucker leaves solder in the hole
The pump may be too far from the molten solder, the solder may have solidified before triggering, or the nozzle may be blocked. Reheat the joint, place the nozzle close to the liquid solder, and trigger the pump promptly. A second pass with braid can remove the thin residue left in the plated hole.
The component will not come out
Do not pull harder. Recheck every lead on both sides of the board and look for solder hidden beneath the component body or around a ground connection. Reheat and clear each hole separately. If the part is glued down or the board is beginning to flex, stop and reassess the removal method.
A pad has lifted
Stop heating and pulling. A lifted pad may still be attached to a trace or via, so further movement can make the damage worse. Photograph the area, check whether the trace remains connected, and repair it with an appropriate wire or trace-repair method only if you understand the board layout. For fine-pitch, multilayer, or safety-critical boards, use a qualified repair technician.
The solder bridge will not clear
Apply flux, place fresh braid over the bridge, and heat it briefly. Keep the braid moving to a clean section. If nearby pads are small or close together, use a fine tip and avoid pressing down on the board.
Tips for safer, cleaner desoldering
- Keep the iron tip clean and lightly tinned.
- Use the smallest tip that transfers heat effectively; an overly small tip may require excessive heating time.
- Support the board rather than holding it in your hand.
- Use fume extraction or ventilation, especially when working with flux.
- Wash your hands after handling solder, particularly if leaded solder may be present.
- Store removed components separately if you need to identify or reinstall them.
- Replace worn braid, clogged pump nozzles, and damaged iron tips rather than compensating with excessive heat.
If a board has repeated pad damage, extensive corrosion, unusual coatings, or many tightly packed pins, a dedicated desoldering tool or professional service may be a better choice than a basic iron and pump.