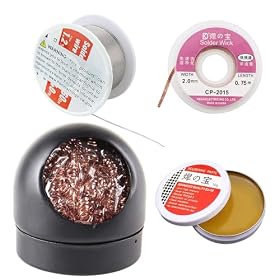
Tinning a soldering iron tip means coating the working surface with a thin layer of solder. Do this before the first joint, after cleaning the tip, and whenever the tip starts looking dry or solder stops flowing easily. A properly tinned tip transfers heat more efficiently and is less likely to oxidize.
What you need
- A soldering iron or station with a compatible tip
- Solder, preferably flux-core electronics solder
- Brass tip-cleaning wool or a damp cellulose sponge
- A stable, heat-resistant work surface
- Optional: tip-tinner or tip-rejuvenator for a badly oxidized tip
Use solder intended for electronics work. Plumbing solder, acid-core solder, and other chemically aggressive products can damage the tip and circuit board.
How to tin a soldering iron tip
1. Install the tip correctly
With the iron unplugged and cool, fit the tip according to the manufacturer's instructions. Make sure it is fully seated and secure. Never handle a hot tip with bare fingers or force a tip that does not match the iron.
2. Heat the iron to an appropriate temperature
Set the station to the temperature recommended for your solder and work. If the manufacturer does not provide a starting point, use a moderate setting rather than immediately selecting the highest temperature. Lead-free solder generally needs more heat than traditional leaded solder, but excessive temperature accelerates oxidation and can damage pads or components.
Allow the iron to reach temperature before applying solder. Many stations indicate this with a display or ready light.
3. Clean off old residue
Gently wipe the hot tip on brass wool or briefly on a damp sponge. The goal is to remove loose oxidation and residue, not to scrub aggressively. Brass wool usually removes less heat and solder than a wet sponge, while a sponge should be damp rather than soaking wet.
Do not use sandpaper, a file, a knife, or other abrasive tools on a plated soldering tip. Removing the plating can permanently shorten the tip's life.
4. Apply solder to the tip
Touch solder to the heated tip, preferably near the point where the tip meets the thicker section. The solder should melt and spread across the working surfaces. Rotate the iron slightly if needed so the coating reaches the sides and underside.
You need a thin, shiny film—not a large ball or thick lump. Once the tip is coated, wipe it lightly on brass wool or a damp sponge to remove excess while leaving a visible layer behind.
5. Re-tin before making the joint
Apply a small amount of fresh solder to the clean tip immediately before touching it to the work. This thin layer forms a heat bridge between the tip and the component lead or pad, helping heat flow into the joint.
After finishing a joint, wipe away excess residue and leave a small amount of solder coating on the tip before returning the iron to its stand. That protective coating helps prevent oxidation during idle periods.
How to tell if a tip is properly tinned
A properly tinned tip usually has a thin, smooth, silvery coating on the working area. Solder should melt readily and spread instead of forming a bead that rolls away.
A tip may need cleaning and re-tinning if it is:
- Dark gray, black, or visibly crusted
- Dry-looking after heating
- Covered in burnt flux or old solder
- Unable to transfer heat well
- Causing solder to ball up rather than wet the surface
The very end of a fine conical tip may not stay completely coated because its small surface area loses heat quickly. The broader working surfaces are more important than forcing a large blob onto the point.
What if the solder will not stick?
Work through these checks in order:
- Clean the tip gently. Remove burnt flux and loose oxidation with brass wool or a damp sponge, then apply fresh flux-core solder.
- Confirm the iron is actually hot. Check the station display or ready indicator. A loose tip, dirty heater connection, failed sensor, or incorrect setting can prevent normal heating.
- Check the solder. Make sure it is electronics solder and that the flux core has not been depleted or contaminated.
- Use tip tinner for moderate oxidation. Follow the product instructions, heat the tip as directed, and remove the excess afterward.
- Inspect the plating. If the tip has pits, missing plating, deep black oxidation, or exposed copper, replacement is usually the right option.
Do not keep increasing the temperature indefinitely. High heat can burn flux, oxidize the tip faster, lift circuit-board pads, and damage heat-sensitive components.
Flux and solder choices
Flux-core solder is usually the simplest choice for hand soldering because it releases flux as the solder melts. Additional electronics flux can help when repairing oxidized wires or older joints, but use a flux designed for electronics and clean residue according to its instructions.
Rosin and no-clean fluxes are common in electronics. Acid flux intended for plumbing should not be used on electronic assemblies because its residue can remain corrosive or conductive.
Solder diameter also affects control. A thinner wire makes it easier to feed small amounts onto a fine tip and small joint; thicker solder can be convenient for larger wires but may apply too much material to delicate work.
When should you tin the tip?
Tin the tip:
- When using a new or freshly installed tip
- Before the first solder joint
- After cleaning the tip
- When solder stops wetting the surface
- Before placing the iron in its stand for a longer pause
- Before switching the iron off
Do not leave the iron heated for long periods with a completely bare, dry tip.
When to replace the tip
Replace the tip when cleaning and tip tinner no longer restore solder wetting, or when the tip is physically worn. Deep pits, severe erosion, exposed base metal, a misshapen point, or a loose fit are signs that replacement is more sensible than continued reconditioning.
Choose a tip that matches the station or iron's tip family and that suits the joint size. A fine tip is useful for small pads and closely spaced leads, while a wider chisel or bevel tip often transfers heat more effectively to ground planes, connectors, and heavier wires. The largest tip that fits the joint without touching nearby pads is often easier to control than an extremely fine point.
Always follow the iron or station manufacturer's instructions for compatible tips, temperature settings, cleaning methods, and replacement.