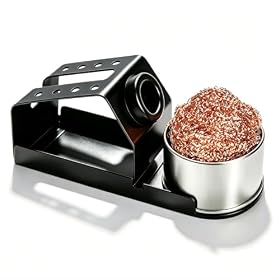
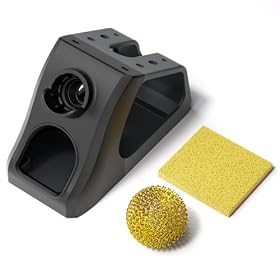
A proper soldering iron sleep stand does more than hold the iron. It can trigger standby mode, reduce tip oxidation, and lower the chance of burns when the tool is idle.
A soldering iron sleep stand cools the tip by placing the iron in a holder that signals the station to enter standby or reduced-temperature mode. It does not usually cool the tip with a fan or active refrigeration. The important features are stand compatibility, reliable position sensing, a stable holder, and a tip-cleaning method that will not damage plated tips.
How a sleep stand cools the tip
A compatible stand typically works with a temperature-controlled soldering station in one of two ways:
- Mechanical or magnetic sensing: Placing the iron in the stand activates a switch or sensor.
- Station-controlled standby: The station lowers the set temperature after detecting that the iron is parked.
The tip may remain warm rather than becoming cold immediately. This is intentional. A reduced standby temperature helps limit oxidation and tip wear while allowing the iron to recover more quickly when you pick it up.
A basic iron rest without a sensor will hold the iron safely, but it will not necessarily reduce temperature. Check the station and stand documentation before assuming that any replacement stand can activate sleep mode.
Features that matter when choosing one
Compatibility with the station
The stand must communicate with the station or match the station’s control system. Some stands use a dedicated connector, while others are designed only for a particular station family. A universal metal holder may be physically suitable but unable to activate standby mode.
Look for documentation that specifically mentions sleep, standby, hibernation, or temperature reduction. Do not rely on the stand’s appearance alone.
A stable, heat-resistant holder
The holder should support the handle without forcing the tip against metal or allowing the iron to roll out. A broad, weighted base is useful on a crowded workbench. The stand should also keep the hot tip away from power cords, plastic parts, and the bench surface.
Tip cleaner choice
Many stands include a brass-wool cleaner, a damp sponge, or both.
- Brass wool removes oxidation and excess solder with less thermal shock than a wet sponge.
- A damp sponge can clean effectively, but the sudden temperature change may reduce tip temperature and contribute to wear if used constantly.
- A dry metal scraper or abrasive pad can damage the tip’s protective plating and is generally a poor choice for routine cleaning.
Use the cleaner recommended by the tip and station manufacturer. Keep brass wool free of loose debris that could contaminate a fine-pitch tip.
Sensor reliability
A sleep stand is only useful if the station consistently recognizes when the iron is parked. The holder should guide the handle into the same position each time. A loose or misaligned sensor can leave the iron at full operating temperature even when it appears to be resting correctly.
Tip access and workflow
Choose a stand that lets you return the iron quickly without twisting the cable. If you regularly change tips, make sure the holder leaves enough clearance for the handle and does not obstruct nearby tools or components.
What a sleep stand does—and does not—protect against
Lowering the idle temperature can reduce unnecessary heat exposure, oxidation, and accidental contact risk. It can also extend working time between tip replacements when the iron spends a lot of time parked.
It does not replace basic safety practices. The iron remains hot in standby, and the tip can still burn skin, insulation, or a work surface. Always follow the station manufacturer’s instructions, keep the iron in its holder when not in use, and switch the station off when leaving the bench.
Troubleshooting a stand that does not cool the tip
1. Confirm that the station supports sleep mode
Some stations have adjustable standby settings, while others do not support automatic temperature reduction. Check the manual or control menu for sleep, standby, hibernation, or idle-temperature settings.
2. Check the connection
Power off the station before inspecting a dedicated stand cable or connector. Make sure the plug is fully seated and that the cable is not pinched or damaged. Do not substitute a connector or adapter unless the manufacturer specifies that it is compatible.
3. Reposition the iron
Place the handle fully into the holder in the intended orientation. If the stand uses a magnet, switch, or position sensor, an iron resting beside the sensing area may not trigger standby.
4. Inspect for contamination or mechanical damage
Solder, flux residue, or debris can prevent a switch from moving or stop the handle from seating correctly. Clean the stand only as directed by its manufacturer. Replace a cracked holder, loose sensor, or damaged cable rather than attempting an improvised repair.
5. Check the standby setting and delay
Some stations wait for a preset period before reducing temperature. Others allow the user to select the standby temperature or disable the feature. A delayed response does not necessarily indicate a fault.
6. Test with the correct iron and stand combination
A stand made for a different iron or station may hold the tool safely but lack the required sensing circuit. If the feature still does not work after checking the settings and connection, a manufacturer-approved replacement stand is the sensible next step.
Is a sleep stand worth buying?
It is most useful if you frequently pause while soldering, work with delicate plated tips, or want automatic temperature reduction without repeatedly adjusting station controls. A basic rest may be enough for short, continuous soldering sessions, but it will not provide the same automatic idle-temperature management.
Prioritize compatibility and sensor operation over decorative features. The best stand is one that keeps the iron stable, cleans the tip appropriately, and reliably tells the station when the iron has been parked.