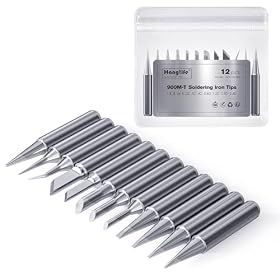
If your soldering iron is not heating up, start with the tip, power connection, temperature setting, and heater indicator. These checks can identify a worn consumable or a failed iron without opening the tool.
Soldering iron not heating up
If your soldering iron is not heating up, first determine whether the whole iron is cold or only the tip fails to transfer heat. A damaged or poorly installed tip is common, but the cause can also be an incorrect station connection, a failed heating element, a bad power cord, or an electrical fault. Unplug the iron before handling the tip or inspecting connections, and follow the manufacturer's instructions.
Start with the tip
A soldering tip is a consumable part. It can become heavily oxidized, pitted, loose, or incompatible with the iron. Any of these conditions can make the tool seem as if it is not heating.
Turn off and unplug the iron. Allow it to cool completely.
Remove and reinstall the tip according to the manufacturer's instructions. Do not force a stuck tip.
Check that the tip is the correct type and size for the iron or station.
Look for severe black oxidation, cracks, deep pits, or a tip that has lost its working shape.
Replace a damaged tip rather than filing or sanding it. Abrasive cleaning can remove the plating and shorten its life.
If the handle or cartridge becomes hot but solder will not melt at the tip, a worn tip, insufficient wetting, or incorrect temperature setting is more likely than a failed heater. Clean the tip with the approved brass wool or damp sponge, then apply a small amount of solder to the working surface.
Check the power and station connections
For a standalone iron, confirm that the power switch is on and that the plug is fully inserted. Try a known-working outlet only if doing so is safe and practical. Do not use a damaged extension cord or power strip.
The handpiece plug is fully seated in the station.
The station is set to a normal working temperature rather than standby, sleep, or an unusually low setting.
The display or indicator shows that the station is actively heating.
The iron is placed in the correct handpiece connection, if the station has more than one outlet.
Some stations display an error code or warning when the handpiece, sensor, or heater is disconnected. Consult the manual for the exact meaning instead of repeatedly powering the unit on and off.
Product prices and availability are accurate as of the date/time indicated and are subject to change. Any price and availability information displayed on Amazon.com at the time of purchase will apply to the purchase of this product.
Check whether the indicator matches the actual heat
A lit power indicator does not always mean the tip is heating. After allowing the tool the normal warm-up time specified by the manufacturer, hold the tip near—not against—an appropriate amount of solder. Do not touch the tip with your fingers or test it on skin.
No indicator, no heat: suspect the outlet, power switch, cord, fuse, or internal electrical fault.
Indicator on, handle cold: suspect the handpiece connection, heater, temperature sensor, or control electronics.
Handle warm, tip cold: suspect the tip, cartridge fit, or a heat-transfer problem.
Tip heats briefly and then stops: suspect a sensor, heater, control, or connection fault; an error message may provide more information.
Do not rely on a visual test alone if the temperature is critical. A suitable tip thermometer or the station's supported calibration procedure may help verify temperature, but use only methods approved for that equipment.
Product prices and availability are accurate as of the date/time indicated and are subject to change. Any price and availability information displayed on Amazon.com at the time of purchase will apply to the purchase of this product.
Inspect the cord, handle, and cable
With the iron unplugged and cool, inspect the cord and handpiece cable for cuts, melted insulation, exposed conductors, sharp kinks, or loose strain relief. Gently check whether a connector feels loose, but do not pull on the cable or bend it sharply.
Do not continue using an iron with a damaged cord, cracked handle, exposed wiring, burning smell, smoke, or signs of overheating. Replace the cord or handpiece only with a compatible manufacturer-approved part, or have the equipment assessed by a qualified repair professional.
Product prices and availability are accurate as of the date/time indicated and are subject to change. Any price and availability information displayed on Amazon.com at the time of purchase will apply to the purchase of this product.
Confirm the setup and operating mode
A station may appear not to heat when it is in a protected operating mode. Check for:
A lockout or child-lock setting
Sleep or automatic standby mode
A temperature limit or preset that is too low for the solder being used
A disconnected or incorrectly installed handpiece
A cartridge or tip that the station does not recognize
A voltage selector that does not match the local supply, if the equipment has one
Never bypass a thermal cutoff, interlock, fuse, or temperature-control feature. Do not connect a handpiece to a station unless the manufacturer identifies it as compatible.
Look for contamination and heat-transfer problems
Flux residue, burnt solder, or debris around a removable tip can prevent proper heat transfer. Once the iron is unplugged and cool, clean only according to the manufacturer's instructions. Some cartridge-style systems require the cartridge to seat fully; other irons use a tip and retaining sleeve. The correct procedure differs by design.
Do not immerse the handpiece in liquid, pour cleaner into the handle, or scrape internal contacts with a sharp tool.
When the heater or electronics may have failed
If the iron has power but never warms, the heater, temperature sensor, control board, or internal connection may have failed. A station that shuts down repeatedly, shows a heater or sensor error, or produces an unusual smell should be removed from service.
Avoid opening a mains-powered station unless you are qualified to work on electrical equipment and the manufacturer permits service. Unplugging a unit does not guarantee that all internal components are immediately safe to touch.
A replacement heater or handpiece can make sense when the manufacturer supplies a compatible service part and the rest of the equipment is in good condition. Replacement is usually more practical when the iron is inexpensive, has a damaged power cord or housing, uses unavailable parts, or has multiple faults.
Quick troubleshooting sequence
Unplug the cool iron before touching the tip.
Replace a visibly damaged or incompatible tip.
Reinstall the tip or cartridge correctly.
Check the outlet, power switch, station cord, and handpiece connection.
Disable standby or lockout settings and confirm the temperature setting.
Inspect the cable and housing for damage.
Check the manual for error codes and approved cleaning or calibration steps.
Stop using the tool if it smells burnt, sparks, smokes, or repeatedly shuts down.
Replace the handpiece or iron, or seek qualified service, if the heater or electronics appear to have failed.
Never test a suspected electrical fault by touching the tip, exposed conductors, or internal parts. When in doubt, replace the tool with a properly rated compatible unit or have it inspected by a qualified professional.
FAQ
Why is my soldering iron light on but the tip is cold?
The indicator only confirms that the tool has power; it does not prove that the heater is working. Check the tip fit, handpiece connection, temperature setting, error display, and cable. If the handle remains cold after the normal warm-up time, the heater, sensor, or control circuit may have failed.
Can a bad soldering tip stop an iron from heating?
A damaged or incorrectly installed tip can prevent heat from reaching the working end, although the heater may still be functioning. Replace a badly oxidized, pitted, cracked, or incompatible tip with the correct type for the iron.
How do I know whether my soldering iron heater is broken?
If the iron has a confirmed power connection, the correct setting, and a properly installed tip but never warms, the heater or temperature-control system may be faulty. Error codes, repeated shutdowns, or a cold handle support that diagnosis. Do not open a mains-powered station unless qualified to do so.
Should I repair or replace a soldering iron that will not heat?
Repair can be reasonable when a compatible manufacturer-approved handpiece, cartridge, cord, or heater is available and the station is otherwise in good condition. Replacement is often more practical for low-cost irons, damaged housings or cords, unavailable parts, or multiple electrical faults.