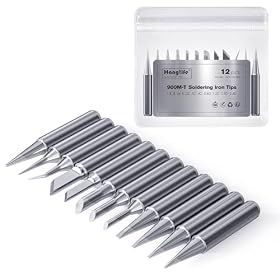
The best iron for repairing earbuds and tiny wires is usually a temperature-controlled station or compact precision iron with interchangeable fine tips. Prioritize control, tip quality, heat recovery, and a comfortable handle over maximum wattage.
The best iron for repairing earbuds and tiny wires is a temperature-controlled soldering iron with fine, interchangeable tips. A compact precision iron is easier to control around small pads and delicate insulation than a large general-purpose iron. Look for adjustable temperature, a narrow but usable tip, fast heat recovery, and a handle that lets you make steady movements.
For occasional repairs, a compact iron can be sufficient. For repeated electronics work, a soldering station is usually the better choice because it offers more stable temperature control, replaceable tips, and a safer place to rest the hot tool.
What matters most for earbud repairs
Adjustable temperature control
Small wires and earbud circuit boards can be damaged by excessive heat. Adjustable temperature lets you use the lowest setting that melts the solder cleanly and completes the joint quickly.
A fixed-temperature iron can work for basic jobs, but it gives you less control when switching between solder types, wire sizes, and circuit boards. Avoid leaving the tip on a small pad longer than necessary; lifting a PCB pad is a common consequence of overheating or prolonged contact.
Follow the iron, solder, and component manufacturers’ temperature guidance. Lead-free solder generally needs more heat than traditional leaded solder, but the correct setting also depends on the tip, joint size, and the thermal mass of the workpiece.
Fine tips without going excessively small
A small conical or narrow chisel tip helps you reach tiny solder pads and separate closely spaced connections. However, the thinnest possible tip is not always best. Extremely fine tips hold less heat and can make it harder to transfer heat into the joint.
A useful tip set should include:
A fine conical tip for small wires and tight spaces
A narrow chisel tip for transferring heat efficiently to a pad
At least one replacement tip in the size you use most often
For earbud cables, a narrow chisel tip is often easier to control than a needle-like tip because it can heat the joint quickly without requiring prolonged contact.
Stable temperature and heat recovery
Temperature stability matters when soldering a wire to a small pad. If the tip cools sharply as soon as it touches the joint, you may instinctively hold it there longer, increasing the chance of damaging insulation or lifting the pad.
Look for a tool or station that specifies temperature adjustment and heat recovery rather than choosing solely by maximum wattage. Higher power does not automatically mean a tool is too aggressive; it can allow the iron to recover quickly. The important factors are controllability, the selected temperature, and how easily you can remove heat from the joint.
A comfortable, slim handle
Earbud work requires precise hand movement. A bulky handle can make it difficult to see the joint or control the tip. Choose a handle that is slim enough for pencil-style control but not so small that it becomes uncomfortable during longer repairs.
A flexible, heat-resistant cord also helps. A stiff cord can pull the iron away from a tiny pad just as you are positioning it.
Station or compact soldering iron?
Choose a soldering station when you want control and repeatability
A station is the better choice if you regularly repair cables, circuit boards, headphone plugs, or other electronics. Its advantages usually include:
Adjustable temperature
A separate control unit that keeps the handle relatively light
Replaceable tip options
A stable stand and sponge or brass-wool tip cleaner
Better suitability for repeated work
A station takes up more bench space, but that tradeoff is worthwhile if you expect to do more than a few repairs.
Choose a compact precision iron for portability
A compact iron is useful when storage space is limited or you need to work away from a bench. Many small irons use a USB-C power source or a dedicated power supply, but the power requirements and performance vary by product.
Before buying, check the required power source and whether it can maintain heat with the tips you plan to use. A tool that is convenient to carry is less useful if its power supply cannot support stable operation.
A compact iron should still have adjustable temperature, replaceable tips, a safe stand or resting method, and a handle that stays manageable near the hot end.
Temperature-controlled soldering station for delicate electronics
Product prices and availability are accurate as of the date/time indicated and are subject to change. Any price and availability information displayed on Amazon.com at the time of purchase will apply to the purchase of this product.
Features worth paying for
Prioritize these features in order:
Adjustable temperature control for delicate work
Available replacement tips in fine conical and narrow chisel shapes
Good heat recovery so joints can be completed quickly
A light, comfortable handle for precise positioning
A stable stand that keeps the hot tip away from the work surface
Tip temperature calibration or clear controls if you need repeatable results
ESD-related protection when working on static-sensitive electronics, provided the manufacturer explains how it is implemented
An automatic sleep or standby function is also useful, especially if you are likely to pause while inspecting wires. It should not replace safe handling: always return the iron to its stand and unplug it when finished.
Product prices and availability are accurate as of the date/time indicated and are subject to change. Any price and availability information displayed on Amazon.com at the time of purchase will apply to the purchase of this product.
Tips and supplies that make tiny-wire repairs easier
The iron is only part of the setup. For earbud repairs, also consider:
Thin electronics solder appropriate for your work
Flux that is compatible with the solder and electronics
Heat-shrink tubing for reinforcing the repaired cable
Magnification and bright task lighting
A holder or helping-hands tool to keep the wire still
Earbud conductors may be extremely fine and can have enamel insulation rather than ordinary plastic insulation. Enamel-coated wire may need careful scraping, thermal preparation, or a manufacturer-approved soldering method before solder will adhere. Do not assume that simply applying more heat will remove the insulation safely.
Product prices and availability are accurate as of the date/time indicated and are subject to change. Any price and availability information displayed on Amazon.com at the time of purchase will apply to the purchase of this product.
A practical method for repairing an earbud wire
Identify and document the connections. Photograph the original wiring before desoldering anything. Earbud wires can be color-coded inconsistently.
Secure the cable and board. Movement makes tiny joints harder to form and increases the chance of bridging nearby pads.
Clean and lightly tin the tip. A properly tinned tip transfers heat better than a dry or oxidized tip.
Prepare the wire. Remove only the necessary insulation and avoid nicking the conductor.
Tin the conductor and pad separately when appropriate. Use minimal solder; too much can bridge adjacent contacts.
Join the parts briefly. Touch the tinned wire and pad together, apply heat long enough for the solder to flow, then remove the iron.
Allow the joint to cool without movement. A joint that moves while cooling can become weak or dull.
Inspect under magnification. Check for bridges, loose strands, exposed conductors, or damage to the pad.
Add strain relief. Heat-shrink tubing or another suitable mechanical support can prevent the repaired joint from taking the cable’s pulling force.
Disconnect earbuds and other equipment from batteries, chargers, and audio sources before soldering. If a lithium battery is integrated into the device, do not puncture, crush, or heat it. Stop if the repair requires working directly beside a damaged or swollen battery.
Product prices and availability are accurate as of the date/time indicated and are subject to change. Any price and availability information displayed on Amazon.com at the time of purchase will apply to the purchase of this product.
Common buying mistakes
Choosing the highest temperature or largest iron
More heat is not automatically better for tiny electronics. Excessive heat can soften insulation, damage components, and lift pads. A controllable tool with an appropriate tip is generally more useful than a powerful tool operated without fine adjustment.
Buying a tip that is too fine
A needle tip may look ideal for small work, but it can transfer heat poorly. Keep a narrow chisel tip available for joints that need efficient heat transfer.
Ignoring replacement-tip availability
Tips wear out, oxidize, and can be damaged by aggressive cleaning or unsuitable flux. Before buying an iron, confirm that replacement tips are available in several shapes and that they are sold separately.
Using the soldering iron to hold the wire
The iron should heat the joint, not act as a clamp. Use tweezers, a fixture, or helping hands to hold the wire steady. This improves accuracy and reduces the time the tip must remain on the pad.
Bottom line
For most earbud and tiny-wire repairs, choose a temperature-controlled precision iron or compact soldering station with interchangeable fine tips. A narrow chisel tip is often the most useful starting point, while a fine conical tip helps with cramped spaces. Put temperature control, heat recovery, tip availability, and comfortable handling ahead of maximum heat or headline power.
If an earbud board has torn pads, damaged traces, or a battery mounted close to the repair area, replacing the cable or device may be more reliable than attempting a delicate board-level repair. For equipment connected to mains power or containing a damaged lithium battery, follow the manufacturer’s service instructions or use a qualified repair professional.
FAQ
What temperature should I use for repairing earbuds?
Use the lowest temperature that allows the solder to flow quickly and cleanly, following the solder and iron manufacturer’s guidance. The correct setting varies with leaded versus lead-free solder, tip size, and the thermal mass of the joint.
Is a conical or chisel tip better for tiny wires?
A fine conical tip is useful for cramped spaces, while a narrow chisel tip usually transfers heat more efficiently. A small chisel tip is often the better general-purpose choice if you are buying only one replacement tip.
Can I repair enamel-coated earbud wire with a regular soldering iron?
Sometimes, but enamel-coated wire must first be prepared so solder can bond to the conductor. The required method depends on the wire and insulation. Avoid simply increasing heat, which can damage the wire or nearby parts.
Do I need a soldering station for one earbud repair?
Not necessarily. A compact temperature-controlled iron can handle an occasional repair, provided it has a suitable fine tip and a safe way to rest the hot tool. A station is more useful for repeated electronics work and provides a more stable bench setup.
When should I replace the earbuds instead of repairing them?
Replacement is often more reasonable when the board pad has torn away, multiple wires are damaged, the battery is swollen or physically damaged, or the repair requires work too close to a lithium battery. A repair is also less worthwhile when replacement parts are unavailable or the joint cannot be given reliable strain relief.