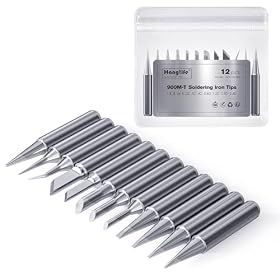
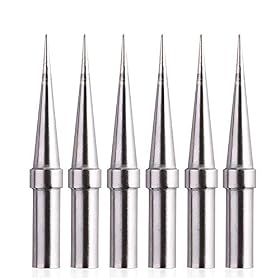
Conical versus chisel tip: Which soldering tip should you use?
Conical tips offer precision for small joints, while chisel tips transfer heat more efficiently across larger pads and leads. The right choice depends on the joint, not just the component size.
A conical tip is best when you need to reach a small or crowded solder joint, while a chisel tip is usually better for efficient heat transfer on pads, wires, connectors, and larger leads. For general electronics work, a small or medium chisel tip is often the more versatile starting point; keep a conical tip for precision access and rework.
The tip shape does not determine the iron’s maximum temperature. It changes how effectively heat reaches the work. A tip that makes better contact with the pad and lead can solder the joint faster and with less need to raise the temperature.
When to choose a conical tip
Choose a conical tip when the joint is small, tightly surrounded by other components, or difficult to approach with a wider face. The pointed end can reach between pins and into narrow spaces without touching nearby pads.
A conical tip is useful for:
Fine-pitch component rework
Small surface-mount pads
Jumper wires and narrow traces
Touch-up work where nearby parts must be avoided
Removing or placing small amounts of solder
The narrow point is also helpful when you need to apply solder to a specific location. However, only the very end makes effective contact, so a conical tip can transfer heat less efficiently to a broad pad or large metal part. Pressing harder is not a good substitute: it can damage the tip, pad, or board.
A conical tip is not automatically better for fine-pitch work
For closely spaced pins, a conical tip can work well for individual joints. But for drag soldering, a small chisel or other flat-edged tip may hold and distribute solder more predictably. Technique, tip size, flux, and solder type all affect the result.
Product prices and availability are accurate as of the date/time indicated and are subject to change. Any price and availability information displayed on Amazon.com at the time of purchase will apply to the purchase of this product.
When to choose a chisel tip
Choose a chisel tip when you need to heat a pad and component lead at the same time. Its flat face offers more contact area, which generally makes it easier to transfer heat into the joint.
A chisel tip can carry a small amount of solder on its face. That solder creates a heat bridge between the tip and the joint, which can help wet the surfaces quickly. Use enough solder and flux for the job, but avoid flooding adjacent pads.
Product prices and availability are accurate as of the date/time indicated and are subject to change. Any price and availability information displayed on Amazon.com at the time of purchase will apply to the purchase of this product.
Which tip is better for common jobs?
Small surface-mount components
Use a fine conical tip or a small chisel tip, depending on access and technique. A conical tip gives precise placement; a chisel tip may heat the pad more consistently.
Through-hole parts
A small or medium chisel tip is generally easier. Place the tip so it contacts both the component lead and the pad, then feed solder into the heated joint rather than onto the tip alone.
Wires and terminals
A chisel tip usually works better because wire strands and terminals require more heat transfer than a sharp point provides. Select a size that heats the joint without touching surrounding insulation or plastic.
Ground planes and large copper areas
Use a suitably broad chisel tip and an iron or station capable of maintaining heat under load. A very fine conical tip may take too long to heat the joint, encouraging excessive dwell time or overheating.
Drag soldering
A small chisel tip can hold a controlled amount of solder and glide across several pins. Flux is often important for preventing bridges. A conical tip can also be used, but it is usually less forgiving for this technique.
Desoldering braid
A chisel tip is often more effective because it can heat the braid and the solder joint over a wider area. Do not force the braid against the board; let heat and fresh flux do the work.
Product prices and availability are accurate as of the date/time indicated and are subject to change. Any price and availability information displayed on Amazon.com at the time of purchase will apply to the purchase of this product.
How tip size affects the choice
The tip should be large enough to transfer heat efficiently but small enough to avoid nearby components and pads. The smallest possible tip is not always the best choice.
Consider these factors:
Pad size: The working face should make useful contact with the pad.
Joint mass: Large terminals and ground planes need more heat transfer.
Access angle: A tip must reach the joint without hitting nearby parts.
Station compatibility: The tip must match the heating system and iron handle.
Avoid choosing a tip solely by its stated width or point diameter. The actual working face, plating, tip length, and shape can affect how it behaves. Always confirm that replacement tips are designed for your specific iron or station; tips that look similar may not fit or heat correctly.
A practical tip set for electronics work
If you are buying only two tips, a useful combination is:
A small or medium chisel tip for general joints, wires, connectors, and heat transfer.
A fine conical tip for crowded areas and precision touch-up.
Add a wider chisel tip if you regularly work on ground planes, heavy wires, terminals, or desoldering braid. Add a specialty fine-pitch or bevel-style tip if your work involves frequent drag soldering.
Technique matters more than shape alone
Whichever tip you use:
Clean and lightly tin the working surface.
Touch the tip to both the pad and the component lead when possible.
Feed solder to the heated joint, not just to the tip.
Remove solder, then remove the tip while the joint is still molten.
Allow the joint to cool without moving the component.
Use the lowest practical temperature and shortest contact time recommended by the solder, components, board, and station manufacturer. Avoid scraping oxidized tips, using excessive force, or leaving the iron unattended. Provide suitable ventilation or fume extraction, and follow safe handling instructions for solder and flux.
Troubleshooting poor results
The solder will not flow onto the joint
The tip may be oxidized, dirty, too small for the joint, or not making contact with both surfaces. Clean and tin the tip, add appropriate flux, and try a broader chisel tip if the joint is large.
The joint takes too long to heat
A conical tip may not have enough contact area. Try a larger compatible chisel tip, verify that the station is set correctly, and check whether the joint is connected to a large ground plane or metal mass.
Solder bridges form between pins
Use less solder, add flux, and reduce the amount carried on the tip. A fine conical tip may help with individual pins; a small chisel tip may be better for controlled drag soldering. Solder wick can remove a bridge when used with care.
Pads lift or the board darkens
Excessive heat, long dwell time, mechanical pressure, or repeated rework can damage the board. Stop and inspect the joint. Use an appropriate tip with better heat transfer rather than simply increasing temperature. Follow the board and component manufacturer’s limits when available.
Bottom line
Choose a conical tip for access and pinpoint control. Choose a chisel tip for efficient heating and general-purpose work. If you are unsure, start with a small or medium chisel tip and add a fine conical tip for crowded or delicate joints. The best choice is the largest compatible tip that reaches the joint without contacting nearby parts.
FAQ
Is a conical or chisel soldering tip better for beginners?
A small or medium chisel tip is often the more forgiving general-purpose choice because its flat face transfers heat efficiently. A fine conical tip is useful as a second tip for tight spaces and small joints.
Can you use a chisel tip for small electronics?
Yes. A suitably small chisel tip can work well on surface-mount pads and fine-pitch pins, especially for drag soldering. It must be narrow enough to avoid adjacent pads and components.
Why does a conical tip struggle with large solder joints?
Only a small portion of its point contacts the joint, so heat transfer may be limited. A broader compatible tip usually contacts more of the pad and lead, heating the joint more efficiently.
What soldering tip is best for drag soldering?
A small chisel or other flat-edged tip is commonly useful because it can carry and distribute a controlled amount of solder across multiple pins. Flux and solder quantity remain important.
Do all soldering tips fit every soldering iron?
No. Tips must match the iron or station’s handle, heating design, dimensions, and compatibility requirements. Check the manufacturer’s replacement-tip specifications before buying.